Thursday, October 3, 2013

Big girl bed....take 2!

I know that every parent thinks their child is the most special, talented, smart, beautiful (etc, etc) child in the world....of course I think that of my sweet Taylor Grace (and my little Stephen Matthew too...but that's a different post). Taylor has blessed our lives since the moment we found out we were pregnant with her.   She's been my strength, my weakness, the reason I have "silvers" before I'm 30, the reason I laugh EVERYDAY, and....the inspiration for this post.

Taylor's crib was one of those convertible cribs that converts from a crib to a toddler bed, then from a toddler bed to a double/full size bed.  I was never really fond of the bed once it converted to the full size bed.  But.... I dealt with it. That was until last week when I decided I was just going to find her a "girly" bed and switch them out...

So, after a little searching around on CL... What do I find??  A bed!  As always, I'm awful about he before pictures, but I basically sanded it verrrrry lightly. Primed it with some Kilz, and broke out my new toy (spray gun), and sprayed away!!  See below for the process...

I also repainted a small hutch that used to be at my grandparents house.  It was originally painted a "dirty beige", so I "brightened" it up with a little "Peace and Happiness" (a Benjamin Moore color)


Now,  here is the re-done "fresher" hutch. ;)

BEFORE:


Afters....


Here are some of the other nick nacks I've revamped in her room (previously). 


Monday, September 2, 2013

Rock me momma....

There is this little {best kept secret} Thrift Store in Pennsylvania where my family is from...Christy knows EXACTLY what I am talking about....let's just call this "special little place"..."RWB". 

I had picked up two {kid} wooden rocking chairs a few months back...I think I paid $3.50 each...which is high for what you normally pay at this place...but they were SO cute I couldn't help myself!!

I had been meaning to paint them...but just never got around to it {story of my life}...but then a couple weeks ago, while "yard-saling" with a friend, I came across another little wooden rocking chair!  The lady was asking $5...but of course, walked away with only paying $3.  So here I have 3 little rocking chairs that I paid about $10 for...

I was going to paint them gray...then teal....then I was thinking yellow....well...THEN I finally decided to not paint them matching at all, but rather paint them each a different "funky" and "bright" color...so, here you go!


First, I took them outside and gave them a good scrub-down.  After letting them dry {or shall I say "bake"} in the hot summer sun, I started to spray!


After a coat, I let dry overnight and took them out the next day to give another coat.


Here is how then turned out!  I love them!


Tuesday, August 27, 2013

She put the cork in the frame, and hung it all up


I don't know WHY, but I have that song, "She put de lime in de coconut, and drank it all up"...{or however it goes} stuck in my head!!!!!......hence the title of this post... =)

ANYWAY, that's neither here nor there...what IS here and there is this mirror that I re-vamped into a cork board. 

I had a mirror sitting in by basement closet since we've moved into this house.  It's just been sitting there...patiently waiting for me to DO SOMETHING with it.

I think I had gotten this mirror at Home Goods...probably 6 years ago...but I remember getting it for super cheap because there was a small {and I mean small} scratch on the corner of the mirror.  Hey, I am not going to turn down a discount!

SO anyway...I had no use for this as a mirror...and I didn't want to hang it up somewhere just for the sake of hanging it up...so, I waited until this fine day to make it into something USEFUL.....a CORKBOARD!!  Whoop Whoop!

This was actually more work than I thought...as I had to unglue all these support blocks that were keeping the mirror snug to the backing.  So after I pried them all off, I got to work!

Started with wiping the years worth of dust off the frame, then painting a coat of paint...waiting for it to dry overnight...then....here comes the fun part....putting the cork in!

I had an old corkboard with the original {pressboard} frame {broken}...so I took the remainder of the frame off and just used the cork!  It fit PERFECTLY!!!  So, I reused some of those old support blocks to make sure the cork was snug to the frame, and viola!

Of course, I got too excited and forgot to take before pics...so just use your imagination when you see the silver frame {yes, there used to be a mirror in it!}

Here is the semi-before picture...I had already taken the mirror out and set the cork in {to make sure it fit}.


 After a couple coats of paint, and some cute fleur-de-lis push pins, the final product!


Have you done anything cool with YOUR cork??  =)


Saturday, August 17, 2013

Quick Little Table Repaint

While I was painting the door... while waiting for each coat to dry... I did another little project on my kitchen island.

When I made-over my daughter's room with the teal accents, I noticed the need for a little cabinet.  She had a Target pressed-board-drawer-unit-that-had-seen-better-days as a catchall for some craft things.  I found this in the local ReStore for $15.
The paint on top was worn, and the drawers banged up, but that gives it character.  Inside we found a keyboard "A" key, and behind the drawers, a dress sock.  Guess they stored socks and computer parts in there???


Just a few coats of paint and a little chevron shelf paper (again)....


And, it's ready for her room!  So much better than a Target storage unit.  Next trip to Hobby Lobby or Home Depot, and we'll switch the knobs for something cuter.


A cute little basket would just perfect the unit... gotta keep on the lookout for the right size.  

My daughter and I just picked up a solid pine end table at a yard sale this morning for $5 to put next to her "free" reading chair.  Her room is almost done.  :)  Good thing, because school starts soon and my free time will be gone.


Friday, August 16, 2013

Chalkboard Door Fun

On my summer to-do list was "painting the garage interior door".  I wanted to paint the side facing the garage something fun.  Well, while thinking it over, I decided to paint the inside part too.

After asking for my husband's input, we decided to go with chalkboard paint on the whole thing, rather than just semi-gloss black.  I've seen Pinterest photos of just the "raised part" being chalkboard... but decided all black was more our *thing*.

Besides, after seeing Lizzie do the same thing to her inside of the same door (180 flip of my house), I figured it was an awesome idea.  You have no idea how many cool ideas are just sitting in her house, waiting for me to copy.  
:)  

Here's her post.

So, I started painting..... yes, no drop-cloth.  I'm impulsive in my painting sometimes.  I decided it was worth it to just have a wet paper towel for drips.  It worked.


 After the door was painted well (three coats), I had the big decision... and even consulted Facebook friends about it too.  Do I prime the WHOLE thing... or just the raised portions?  I got advice on both sides.  I know once a chalkboard is primed, it gets that dirty gray look.  I wasn't sure I could handle it, being so close to the kitchen where I'd see it constantly.  

Maybe I should just forget it's a chalkboard and use the Cricut to write a quote in vinyl instead.  I hate the 6 panel thing though... it's tough to work around with vinyl... especially anything long.

So, first I primed the middle two panels... just to see.  Then I cleaned them with a wet sponge.  I was pleased with the results... so I dove in.  Here's the rest of the door, primed with chalk....
My dog was attracted to the dust... he's attracted to absolutely ANYTHING on the floor, I swear.  Our yard can look like confetti sprinkled over it
... ifyouknowwhatImean.

Then I began tinkering with some doodles.  Here's what I cranked out in 20 minutes before having to head out to a friend's house.  After that discussion on Facebook, I figured I needed to show my decision, and this is the photo I posted.

When I came home, I decided it needed more.  So, I searched for more inspirational quotes/thoughts/verses.... and various colors of chalk.

I had a grand ol' time!!

Oh, yeah... it's covered.

Yeah, I'll get tired of reading this after awhile.  

Yeah, it's chalk so it'll eventually get smudged and messy... and there will be chalk dust around.

However, it's fun and inspirational.  It's just chalk!  Thus, I can erase it whenever I want.  And chalk dust is easy to clean with a wet paper towel on hardwood.  :)

So, let it be known that in my neutral, non-cluttered, grown-up-looking, non-flashy home, there is one little corner of whimsy.

And yes, maybe SOMEDAY I'll erase it all and actually let the kids use it, too.  LOL


Linked to Gotta Create

Tuesday, August 13, 2013

My Hobby Lobby find

Gotta love me some 80% off finds at Hobby Lobby!

Here's the latest.... instead of the mirrors, which seemed a tad fancy for the room...

I found this awesome clock at Hobby Lobby for $30, down from $150.  

Let's just forget the fact that my gotta-touch-everything highly inquisitive youngest daughter was playing with the mechanism while I was screwing the anchor into the wall.  She broke it.  It's permanently 3:20 at our house now.  But it looks cool!


Monday, August 12, 2013

Master Redo

Ever paint a room in a color that wasn't necessarily YOUR first choice?

A few years ago, after moving into our new home, I decided I wanted a chocolate brown bedroom.  Dark brown walls with cream and tan accents.  However, after picking out swatches and loving the dark shades, both my husband and I were concerned they were too dark for the room.

I didn't want our nice new bedroom to feel like a dungeon, so we went a bit lighter (to be "safe").

Ahhh... safe.  
Somehow, for me, SAFE usually equals NOT HAPPY.

Here's what we had:
This was new bedding almost three years ago, too.  I wanted a neutral palette.  I didn't realize the pattern was going to be more silver and gold than gray and tan.  Still, it was pretty enough and one of the more expensive bedding sets I've ever purchased.  I think it was the first matching bedskirt and throw pillows I ever owned for our kingsize bed.  So, I was determined to like it.  

Hey, at least the window wood blinds matched nearly perfectly!
We didn't have a headboard/footboard, and really, it just wasn't in our budget at the time.  With a new, larger home, there were more important areas to spend our money.

You know... like lawn care and landscaper to fix the mess left after the building, a ridiculously expensive water filtration system for our new well water, a new SUV to replace the sedan that was getting beaten up by the dirt road, a snowplow for the long driveway...that we didn't even use for twelve months after its purchase, a generator for us country-folk that "lose power often"... and is still in the original box, etc. 

You know... the little stuff.  Ugh!

OH... but I digress.  :)

This was our desk area.  I loved the fact that we could fit this into our bedroom with the spaciousness of the new room.  Now I can blog and surf the web (PINTEREST) without listening to Sam and Cat or Lab Rats all day long.

The pictures don't show the true color of the walls since a flash went off with each photo.  In the photo the paint looks almost orangey.  However, the brown tended to actually have a reddish hue, especially at night in incandescent lighting.  It was warm and cozy... but not what I had originally intended.

So... after that room, I went on to finish painting the rest of the house... five more bedrooms, the main level, hallways, bathrooms, even a closet or two, etc.  I even added stripes and stenciling to a few walls.  :)

And now that most of the house is painted... it was time to revisit these brown walls.

I wanted something cooler, less red.

GRAY.

Not fifty shades... just two.

Behr Cathedral Gray on the main section of the room, and Behr Natural Gray on the two "hallways".

Here's our main bedroom now.

Oops... that doesn't look right.  Darned night-time lighting.  Guess you'll have to wait till you get to the end to see the real color.  (ha!)
You will notice, by this photo, that we are still missing something.  A headboard.  I was determined to fix that.  

After lots of searching on Pinterest and pinning lots of ideas of DIY headboards, I decided EASIEST was best.  The idea of using cabinet doors was intriguing... but too much headache.  I also knew my husband wouldn't appreciate painted "love" on the headboard or anything too fancy.

So, I ventured into Home Depot to see what I could get.  I decided on these:
1" x 8" x 72" paneling boards.  But rather than show the smaller stripes, I decided on the larger ones.... so it looked more like four 8" boards stuck together.  I liked the idea of them fitting into each other nicely to keep it straight and tidy.  My husband and I were careful to choose ones that were all pretty much the same size, had no LARGE knots, and weren't warped.

See... these are the two sides, I stuck with the wider plank look.


So, I pulled out the English Chestnut stain and got to work.


Staining done.

I had my husband cut four 30" strips of 1x3 pine to attach the boards together.  Onto the two boards on the end, I attach the hardware.
Let me tell you... despite trying to find boards that weren't warped, somehow I had a seriously hard time getting the fourth panel popped into place.  But alas, it eventually cooperated was forced into place.

A shot of the back of the headboard.

The headboard, done, but still in my basement.
It didn't bother me to have the little pieces sticking out at the bottom (misjudged the length...oops!).  We don't own an easy-to-use saw that I know of, my husband was at work, my son wouldn't have appreciated being dragged from his computer game to use a handsaw, and I decided it was fine to just let them show.  They are clearly behind the mattress anyway!


It took awhile to get it up and level on my own, but my Pride and Prejudice audiobook kept me entertained all the while.  (Love me some Mr. Darcy.)

Then I added the rest of the bedding.
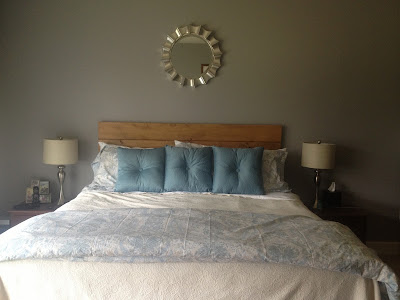
Here's the new bedroom now.
I had the coverlet (Homegoods?) and down comforter (Overstock) already.  I bought the duvet cover and shams from Amazon (their Pinzon brand), the new white sheets from Amazon, and the blue pillows from Kirklands.

The mirror was a HomeGoods find.  

And since my husband loves the old metal plaques, I just moved them to the area over the desk.

I found this chair on a Facebook Yard Sale page.  $20.  It already came with the matching blue pillow.  

I have a few more projects for the summer... not sure what's coming next.
Stay tuned.