Ever paint a room in a color that wasn't necessarily YOUR first choice?
A few years ago, after moving into our new home, I decided I wanted a chocolate brown bedroom. Dark brown walls with cream and tan accents. However, after picking out swatches and loving the dark shades, both my husband and I were concerned they were too dark for the room.
I didn't want our nice new bedroom to feel like a dungeon, so we went a bit lighter (to be "safe").
Ahhh... safe.
Somehow, for me, SAFE usually equals NOT HAPPY.
Here's what we had:
This was new bedding almost three years ago, too. I wanted a neutral palette. I didn't realize the pattern was going to be more silver and gold than gray and tan. Still, it was pretty enough and one of the more expensive bedding sets I've ever purchased. I think it was the first matching bedskirt and throw pillows I ever owned for our kingsize bed. So, I was determined to like it.
Hey, at least the window wood blinds matched nearly perfectly!
We didn't have a headboard/footboard, and really, it just wasn't in our budget at the time. With a new, larger home, there were more important areas to spend our money.
You know... like lawn care and landscaper to fix the mess left after the building, a ridiculously expensive water filtration system for our new well water, a new SUV to replace the sedan that was getting beaten up by the dirt road, a snowplow for the long driveway...that we didn't even use for twelve months after its purchase, a generator for us country-folk that "lose power often"... and is still in the original box, etc.
You know... the little stuff. Ugh!
OH... but I digress. :)
This was our desk area. I loved the fact that we could fit this into our bedroom with the spaciousness of the new room. Now I can blog and surf the web (PINTEREST) without listening to Sam and Cat or Lab Rats all day long.
The pictures don't show the true color of the walls since a flash went off with each photo. In the photo the paint looks almost orangey. However, the brown tended to actually have a reddish hue, especially at night in incandescent lighting. It was warm and cozy... but not what I had originally intended.
So... after that room, I went on to finish painting the rest of the house... five more bedrooms, the main level, hallways, bathrooms, even a closet or two, etc. I even added stripes and stenciling to a few walls. :)
And now that most of the house is painted... it was time to revisit these brown walls.
I wanted something cooler, less red.
GRAY.
Not fifty shades... just two.
Behr Cathedral Gray on the main section of the room, and Behr Natural Gray on the two "hallways".
Here's our main bedroom now.
Oops... that doesn't look right. Darned night-time lighting. Guess you'll have to wait till you get to the end to see the real color. (ha!)
You will notice, by this photo, that we are still missing something. A headboard. I was determined to fix that.
After lots of searching on Pinterest and pinning lots of ideas of DIY headboards, I decided EASIEST was best. The idea of using cabinet doors was intriguing... but too much headache. I also knew my husband wouldn't appreciate painted "love" on the headboard or anything too fancy.
So, I ventured into Home Depot to see what I could get. I decided on these:
1" x 8" x 72" paneling boards. But rather than show the smaller stripes, I decided on the larger ones.... so it looked more like four 8" boards stuck together. I liked the idea of them fitting into each other nicely to keep it straight and tidy. My husband and I were careful to choose ones that were all pretty much the same size, had no LARGE knots, and weren't warped.
See... these are the two sides, I stuck with the wider plank look.
So, I pulled out the English Chestnut stain and got to work.
Staining done.
I had my husband cut four 30" strips of 1x3 pine to attach the boards together. Onto the two boards on the end, I attach the hardware.
Let me tell you... despite trying to find boards that weren't warped, somehow I had a seriously hard time getting the fourth panel popped into place. But alas, it eventually cooperated was forced into place.
A shot of the back of the headboard.
The headboard, done, but still in my basement.
It didn't bother me to have the little pieces sticking out at the bottom (misjudged the length...oops!). We don't own an easy-to-use saw that I know of, my husband was at work, my son wouldn't have appreciated being dragged from his computer game to use a handsaw, and I decided it was fine to just let them show. They are clearly behind the mattress anyway!
It took awhile to get it up and level on my own, but my Pride and Prejudice audiobook kept me entertained all the while. (Love me some Mr. Darcy.)
Then I added the rest of the bedding.
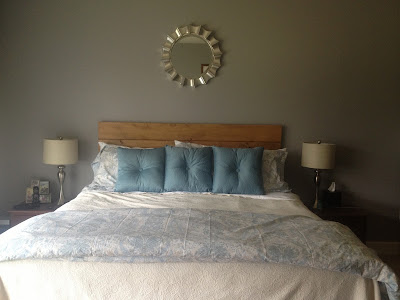
Here's the new bedroom now.
I had the coverlet (Homegoods?) and down comforter (Overstock) already. I bought the duvet cover and shams from Amazon (their Pinzon brand), the new white sheets from Amazon, and the blue pillows from Kirklands.
The mirror was a HomeGoods find.
And since my husband loves the old metal plaques, I just moved them to the area over the desk.
I found this chair on a Facebook Yard Sale page. $20. It already came with the matching blue pillow.
I have a few more projects for the summer... not sure what's coming next.
Stay tuned.
Linked to Gotta Create Wildly Original Party


Wow that is beautiful. I love the wood stain with your wall color!
ReplyDelete